
Embedded
A comprehensive guide to integrating our multi-payment method embedded checkout on your website. This solution allows you to offer Card (Apple Pay & Google Pay), Open Banking, and Credit (Pay Later) options within a single secure component.
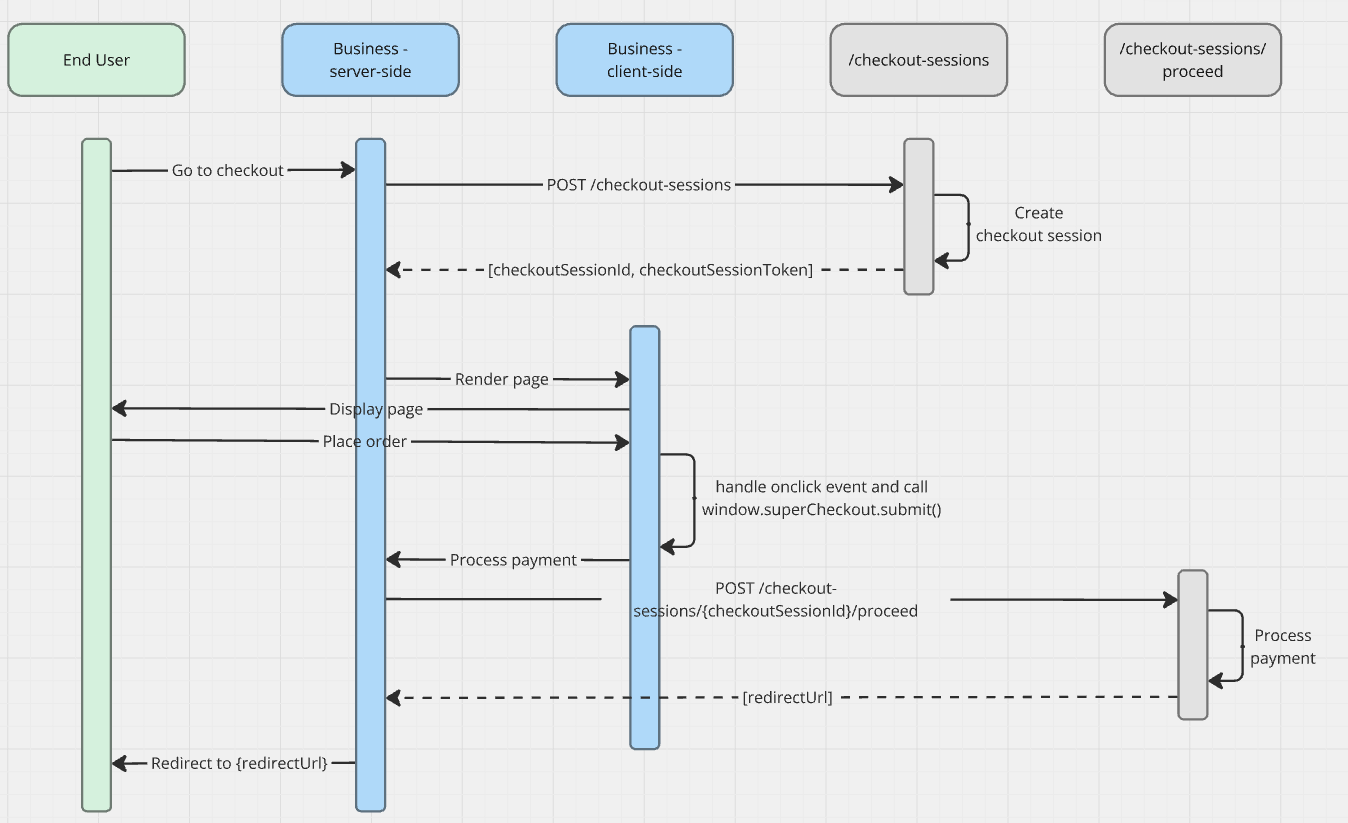
The Payment Journey
- Initialize Session: Your server requests a checkout session; Super returns a secure token.
- Display Component: You render the
<super-checkout>web component on your page using the session token. - Customer Selection: The customer chooses their preferred payment method (Card, Open Banking, or Credit) and enters any required details.
- Frontend Submission: Your site triggers the component's submission; the component validates the payment details.
- Server Authorization: Your server completes the payment by calling the proceed endpoint.
- Final Redirect: You redirect the customer to the provided URL to finalize the transaction or view the success page.
Integration Guide
Follow the steps below to execute an example request, handle the response, and manage the customer redirect.
1. Create a Checkout Session
Before rendering your checkout page, make a server-side call to create a checkout session. This session is necessary to initiate and manage the secure payment process. Your payment initiator ID can be found in the business portal, more on this here.
Request Example
curl --location 'https://api.superpayments.com/2026-04-01/checkout-sessions' \
--header 'Content-Type: application/json' \
--header 'Accept: application/json' \
--header 'Authorization: YOUR_SECRET_KEY' \
--data '{
  "paymentInitiatorId": YOUR_PAYMENT_INITIATOR
}'
curl --location 'https://api.test.superpayments.com/2026-04-01/checkout-sessions' \
--header 'Content-Type: application/json' \
--header 'Accept: application/json' \
--header 'Authorization: YOUR_SECRET_KEY' \
--data '{
"paymentInitiatorId": YOUR_PAYMENT_INITIATOR
}'Response Example
200 Checkout Session Created
{
  "checkoutSessionId": "12345678-2588-469b-a1cc-095a8441e4b6",
  "checkoutSessionToken": "e123456789IsInR5cCI6IkpXVCJ9.eyJwYXltZW50SW5pdGlhdG9ySWQiOiJkYjBkNTUyNS0wYjE3LTRhY2YtYjRmNS04YzQ3NDA1ZTcwNzkiLCJpYXQiOjE3Njg5MjU1NTMsImV4cCI6MTc2OTAxMTk1MywiYXVkIjoiY2hlY2tvdXQiLCJpc3MiOiJjaGVja291dCIsInN1YiI6IjkwODM4ZDc5LTI1ODgtNDY5Yi1hMWNjLTA5NWE4NDQxZTRiNiJ9.hVWctTgGZTmkI4bKFDJX-7IOEoKWbzHn3Zna9XwPvQg"
}
Token Usage: The checkoutSessionToken is used to initialize the frontend component.
Make sure this API call is made on the server side to keep your API key secure.
2. Render the Checkout Page
Add the payment.js library and the <super-checkout> web component to your HTML, adding the checkoutSessionToken from Step 1 and the amount for the transaction.
<html>
  <head>...</head>
  <body>
    ...
    <script src="https://cdn.superpayments.com/js/payment.js"></script>
    <super-checkout amount="AMOUNT" checkout-session-token="CHECKOUT_SESSION_TOKEN_FROM_STEP_1"></super-checkout>
    ...
  </body>
</html>
<html>
<head>...</head>
<body>
...
<script src="https://cdn.superpayments.com/js/test/payment.js"></script>
<super-checkout amount="AMOUNT" checkout-session-token="CHECKOUT_SESSION_TOKEN_FROM_STEP_1"></super-checkout>
...
</body>
</html>3. Customise the Look and Feel (Optional)
Tailor the component to match your brand's design system.
const theme = JSON.stringify({
  hideSuperApp: true, // 'true' to hide "Pay with the Super app"
  tabStyles: {
    backgroundColor: 'transparent',
    selectedBackgroundColor: '#F7F6F4',
    borderColor: '#c8a865',
    borderRadius: '0px',
    borderWidth: '2px',
    color: '#848EA6',
  },
  container: {
    backgroundColor: '#F7F6F4',
    borderRadius: '0px',
  },
  title: { // only applies when `title` property is being used
    fontFamily: 'Tagesschrift',
    fontSize: '30px',
    color: '#848EA6',
  },
});

<super-checkout amount='CART_AMOUNT' checkout-session-token='CHECKOUT_SESSION_TOKEN' theme='STRINGIFY_THEME_OBJECT'title="Example Title"></super-checkout>The theme object needs to be stringify because of how the WebComponent works
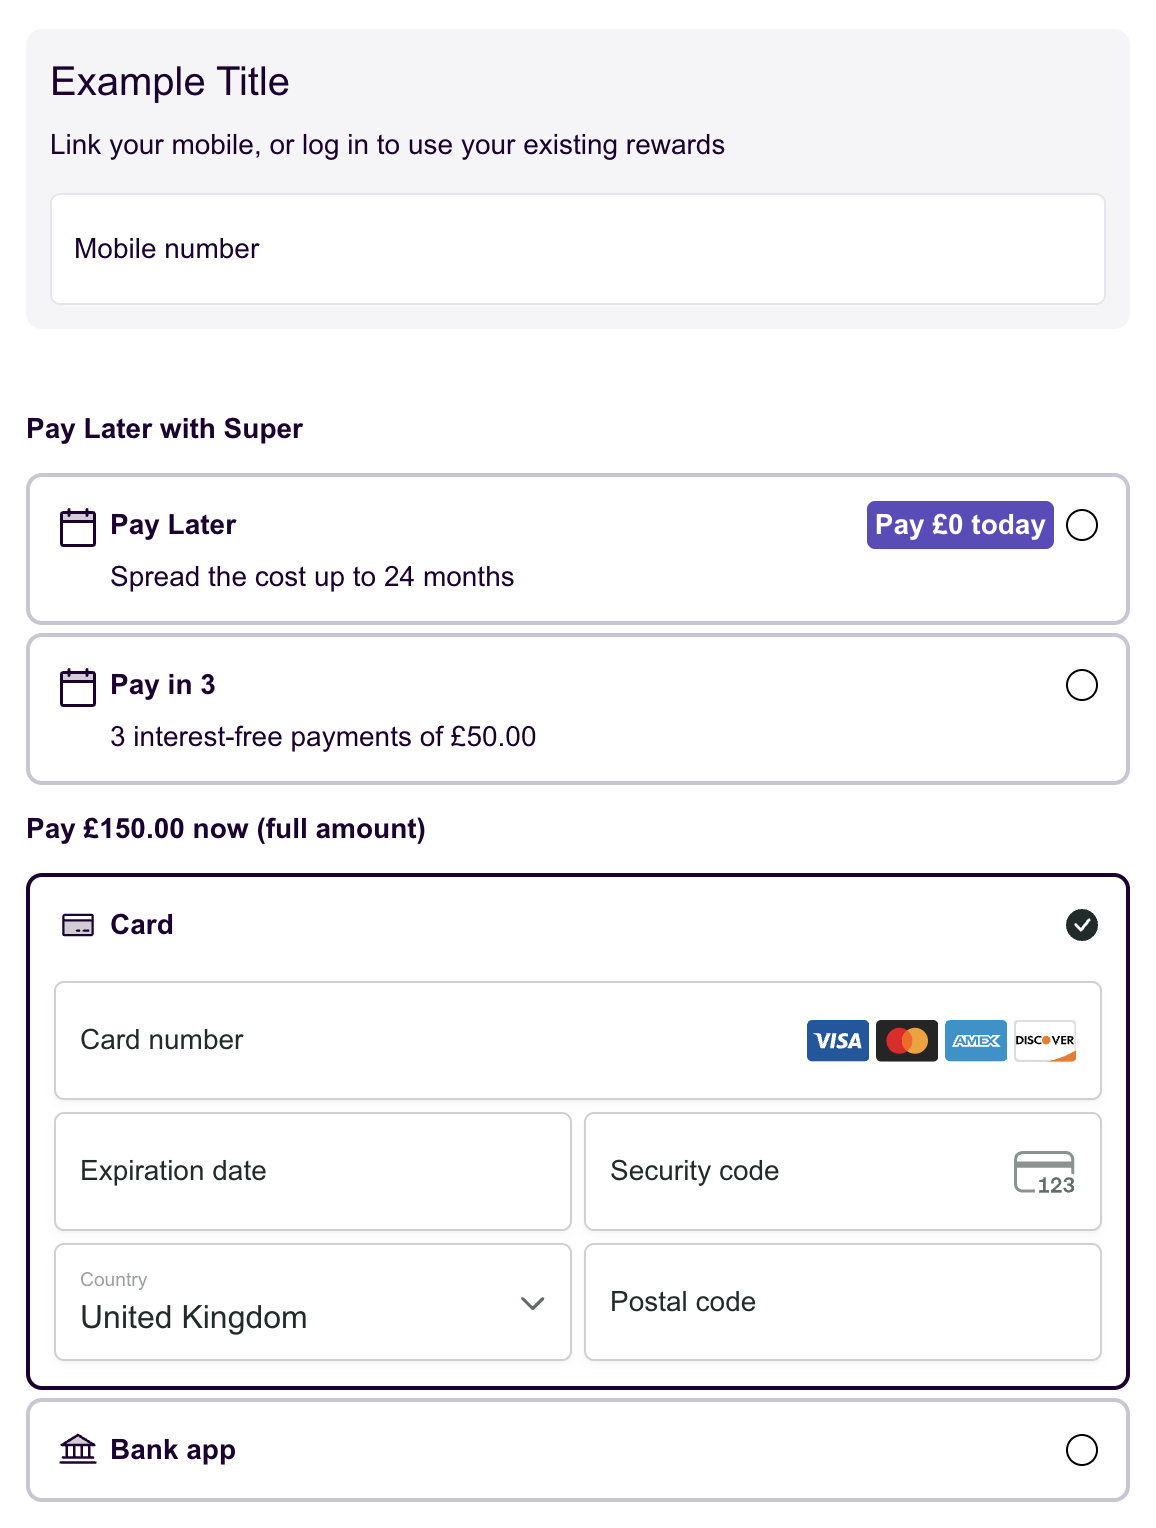
Example using the "theme", "title" and "subtitle" properties
4. Initiate the Payment
When the you are ready to take a payment, call window.superCheckout.submit() to allow the embedded component to complete its necessary steps before proceeding with the payment process.
This can be done by intercepting the click event on your Place Order button
<button onclick="handlePlaceOrderClicked()">Place Order</button>
<script>
async function handlePlaceOrderClicked() {
  const result = await window.superCheckout.submit();

	// Handle any failures appropriately for your checkout, for example...
	if (result.status === "FAILURE") {
		if (result.errorMessage) {
			throw new Error(result.errorMessage);
		} else {
			// Include a default error message in case nothing was received on the failure response.
			throw new Error("Something went wrong. No money has been taken from your account. Please refresh the page and try again.");
		}
	} else if (result.status === "SUCCESS") {
		// Continue to server-side processing
	}
}
</script>
Success Result
{
  "status": "SUCCESS"
}
Failure Result
Prevent server-side processing and display the error message. If no specific error message is included, display a generic message like: Something went wrong. No money has been taken from your account. Please refresh the page and try again.
{
  "status": "FAILURE",
  "errorMessage": "Your card has insufficient funds."
}
4.1 Digital Wallet Setup (Apple Pay & Google Pay)
Super Payments supports Apple Pay and Google Pay directly on your website. Enabling digital wallets requires a quick two-step process: verifying your domain and integrating the payment code.
Step 1: Domain Verification
Before initializing the wallets, you must verify your website domain within the Merchant Dashboard.
- Navigate to Brand Settings: Log in to your Super Payments Merchant Dashboard.
- Select Your Brand: Locate the specific brand you want to configure and click Edit.
- Open Card Configuration: Inside the brand menu, select Card Configuration.
-
For Apple Pay: Download the verification file named
apple-developer-merchantid-domain-associationhosted on this screen. Host this file on your website under the.well-known/directory (e.g.,https://yourdomain.com/.well-known/apple-developer-merchantid-domain-association).⚠️ CRITICAL DEPLOYMENT NOTES:
- Binary transfer: Upload this file using Binary mode in your SFTP/FTP client (e.g., FileZilla, Cyberduck). ASCII mode will corrupt the file structure and cause Apple's validation to fail.
- Content-Type header: Your web server must serve this file with Content-Type: text/plain - no charset suffix (i.e. text/plain; charset=utf-8 will fail). If you're unsure, check using curl -I https://yourdomain.com/.well-known/apple-developer-merchantid-domain-association and look for the content-type line.
-
- Register Your Domain: Click Add domain, enter the full URL of the website where the wallets will be hosted, and save your changes.
- Verify Domain: Click on the three dots, click Verify and wait until the domains are verified.
Step 2: Code Integration
Once your domain is verified, add the following initialization code to your website's checkout page to render the Apple Pay and Google Pay buttons.
<script>
  // Method that SuperPayments will call after getting GPay or Apple Pay token
  // The merchant code should support the form validation inside the handler
  window.superCheckout.registerWalletsHandler(async () => {
	  // Continue to server-side processing
  });
</script>
⚠️ window.superCheckout has to be loaded in memory. As an example you can use the following code
(function () {
  var listenerAdded = false;

  var interval = setInterval(function () {
    if (window.superCheckout && !listenerAdded) {
      listenerAdded = true;
      clearInterval(interval);

      window.superCheckout.registerWalletsHandler(function () {
        // Continue to server-side processing
      });
    }
  }, 500);
})();
5. Complete the Payment
Travel Industry (MCC 4722 / 4511)If your business operates in the travel industry, you are now required to include flight and passenger data in your
/proceed, /payments, /payment-linksrequests. Add thelineItemsarray to your existing request body as shown below. Include one object in thetravellersarray per passenger, this object is only available on the latest API version 2026-04-01.
"lineItems": [
    {
      "type": "AIRLINE",
      "data": {
        "flightNumber": "FR1234",
        "flightDate": "2026-03-15T10:30:00+00:00",
        "travellers": [
          {
            "name": "John Smith"
          },
          {
            "name": "Jane Smith"
          }
        ],
        "totalPrice": 10000,
        "currency": "GBP"
      }
    }
  ]
totalPriceshould reflect the total booking amount in minor units (e.g.10000= £100.00).
After receiving a success result from window.superCheckout.submit(), make a server-side call to the proceed endpoint to continue the checkout session. This ensures that the payment process proceeds securely on the server.
Request Example
curl --request POST \
     --url https://api.superpayments.com/2026-04-01/checkout-sessions/{checkoutSessionId}/proceed \
     --header 'Authorization: YOUR_SECRET_KEY' \
     --header 'Content-Type: application/json' \
     -d '{
  "amount": 10000,
  "cancelUrl": "https://your-site.com/cancel",
  "failureUrl": "https://your-site.com/failure",
  "successUrl": "https://your-site.com/success",
  "externalReference": "your_external_reference",
  "email": "[email protected]",
  "phone": "1234567890",
  "paymentInitiatorId": "INITIATORID",
  "billingAddress": {
    "addressLine1": "Street 1",
    "addressLine2": "Lane ",
    "addressLine3": null,
    "city": "London",
    "country": "GB",
    "postCode": "XY12ZY",
    "firstName": "John",
    "lastName": "Smith",
    "phone": "07462123456",
    "email": "[email protected]"
  },
  "shippingAddress": {
    "addressLine1": "Street 1",
    "addressLine2": "Lane ",
    "addressLine3": null,
    "city": "London",
    "country": "GB",
    "postCode": "XY12ZY",
    "firstName": "John",
    "lastName": "Smith",
    "phone": "07462123456",
    "email": "[email protected]"
  },
  "lineItems": [
    {
      "type": "AIRLINE",
      "data": {
        "flightNumber": "FR1234",
        "flightDate": "2026-03-15T10:30:00+00:00",
        "travellers": [
          {
            "name": "John Smith"
          },
          {
            "name": "Jane Smith"
          }
        ],
        "totalPrice": 10000,
        "currency": "GBP"
      }
    }
  ]
}'
curl --request POST \
--url https://api.test.superpayments.com/2026-04-01/checkout-sessions/{checkoutSessionId}/proceed \
--header 'Authorization: YOUR_SECRET_KEY' \
--header 'Content-Type: application/json' \
-d '{
"amount": 10000,
"cancelUrl": "https://your-site.com/cancel",
"failureUrl": "https://your-site.com/failure",
"successUrl": "https://your-site.com/success",
"externalReference": "your_external_reference",
"email": "[email protected]",
"phone": "1234567890",
"paymentInitiatorId": "INITIATORID",
"billingAddress": {
"addressLine1": "Street 1",
"addressLine2": "Lane ",
"addressLine3": null,
"city": "London",
"country": "GB",
"postCode": "XY12ZY",
"firstName": "John",
"lastName": "Smith",
"phone": "07462123456",
"email": "[email protected]"
},
"shippingAddress": {
"addressLine1": "Street 1",
"addressLine2": "Lane ",
"addressLine3": null,
"city": "London",
"country": "GB",
"postCode": "XY12ZY",
"firstName": "John",
"lastName": "Smith",
"phone": "07462123456",
"email": "[email protected]"
},
"lineItems": [
{
"type": "AIRLINE",
"data": {
"flightNumber": "FR1234",
"flightDate": "2026-03-15T10:30:00+00:00",
"travellers": [
{
"name": "John Smith"
},
{
"name": "Jane Smith"
}
],
"totalPrice": 10000,
"currency": "GBP"
}
}
]
}'After the proceed call, redirect the user to the redirectUrl provided in the response. This will either:
- Redirect the customer to one of the
successUrl,failureUrl, orcancelUrlyou specified earlier. - Redirect the customer to Super Payments to complete further actions, such as opening their bank app for authentication.
In the case of additional steps required by the customer (e.g., authentication via bank app), the redirectUrl will guide them through the next steps before finalizing the payment.
Response Example
{
  "checkoutSessionId": "34cb093c-45ed-49ce-b512-7af62bbe95e6",
  "paymentIntentId": "5034c426-e6d9-49fc-8519-fad8b62bd36a",
  "redirectUrl": "https://web-checkout.staging.superpayments.com/checkout-host?pi-token=eyJhbGciOiJIUzI1NiIsInR5cCI6IkpXVCJ9.eyJzY29wZSI6InBheW1lbnRJbnRlbnQiLCJncm91cHMiOlsicGF5bWVudDpleGVjdXRlIl0sInNvdXJjZSI6IklOVEVOVF9DUkVBVElPTiIsImlhdCI6MTc2ODkzMDgyNCwiZXhwIjoxNzY5MDE3MjI0LCJhdWQiOiJwYXkiLCJpc3MiOiJwYXkiLCJzdWIiOiI1MDM0YzQyNi1lNmQ5LTQ5ZmMtODUxOS1mYWQ4YjYyYmQzNmEifQ.HaPemxxEeKD4dWb8b0aZNetkn1ZUuPIrFPtXXQ2X6nw&id=5034c426-e6d9-49fc-8519-fad8b62bd36a&start=payment&targetPaymentMethod=CARD"
}
Handle Post-Payment Events
Automate your backend processes by listening for real-time transaction updates.
Automate Order Fulfillment
Set up a webhook to handle post-payment events sent by Super. These notifications ensure your system is updated with the final payment status even if the customer closes their browser or leaves the page before the frontend callback completes.
Why Use Webhooks?
Listening to these asynchronous events is essential for a robust integration. It ensures your system stays in sync for all payment methods - including those that require external authentication.
Tip: For more details on setting up webhooks, check out our Webhook Documentation.
Updated about 1 month ago