

Wowcher - Save a Card & Take Payment
Customers can request to store their card details during a payment, which you can then use for future payments without customers having to re-enter the details.
📘 What this guide covers
Steps 1–5: creating the customer, running the initial attended (cardholder-present) payment, and retrieving the saved
paymentMethodIdfrom a webhook. For charging the saved card without the customer present - see Charge a Saved Card .
How It Works
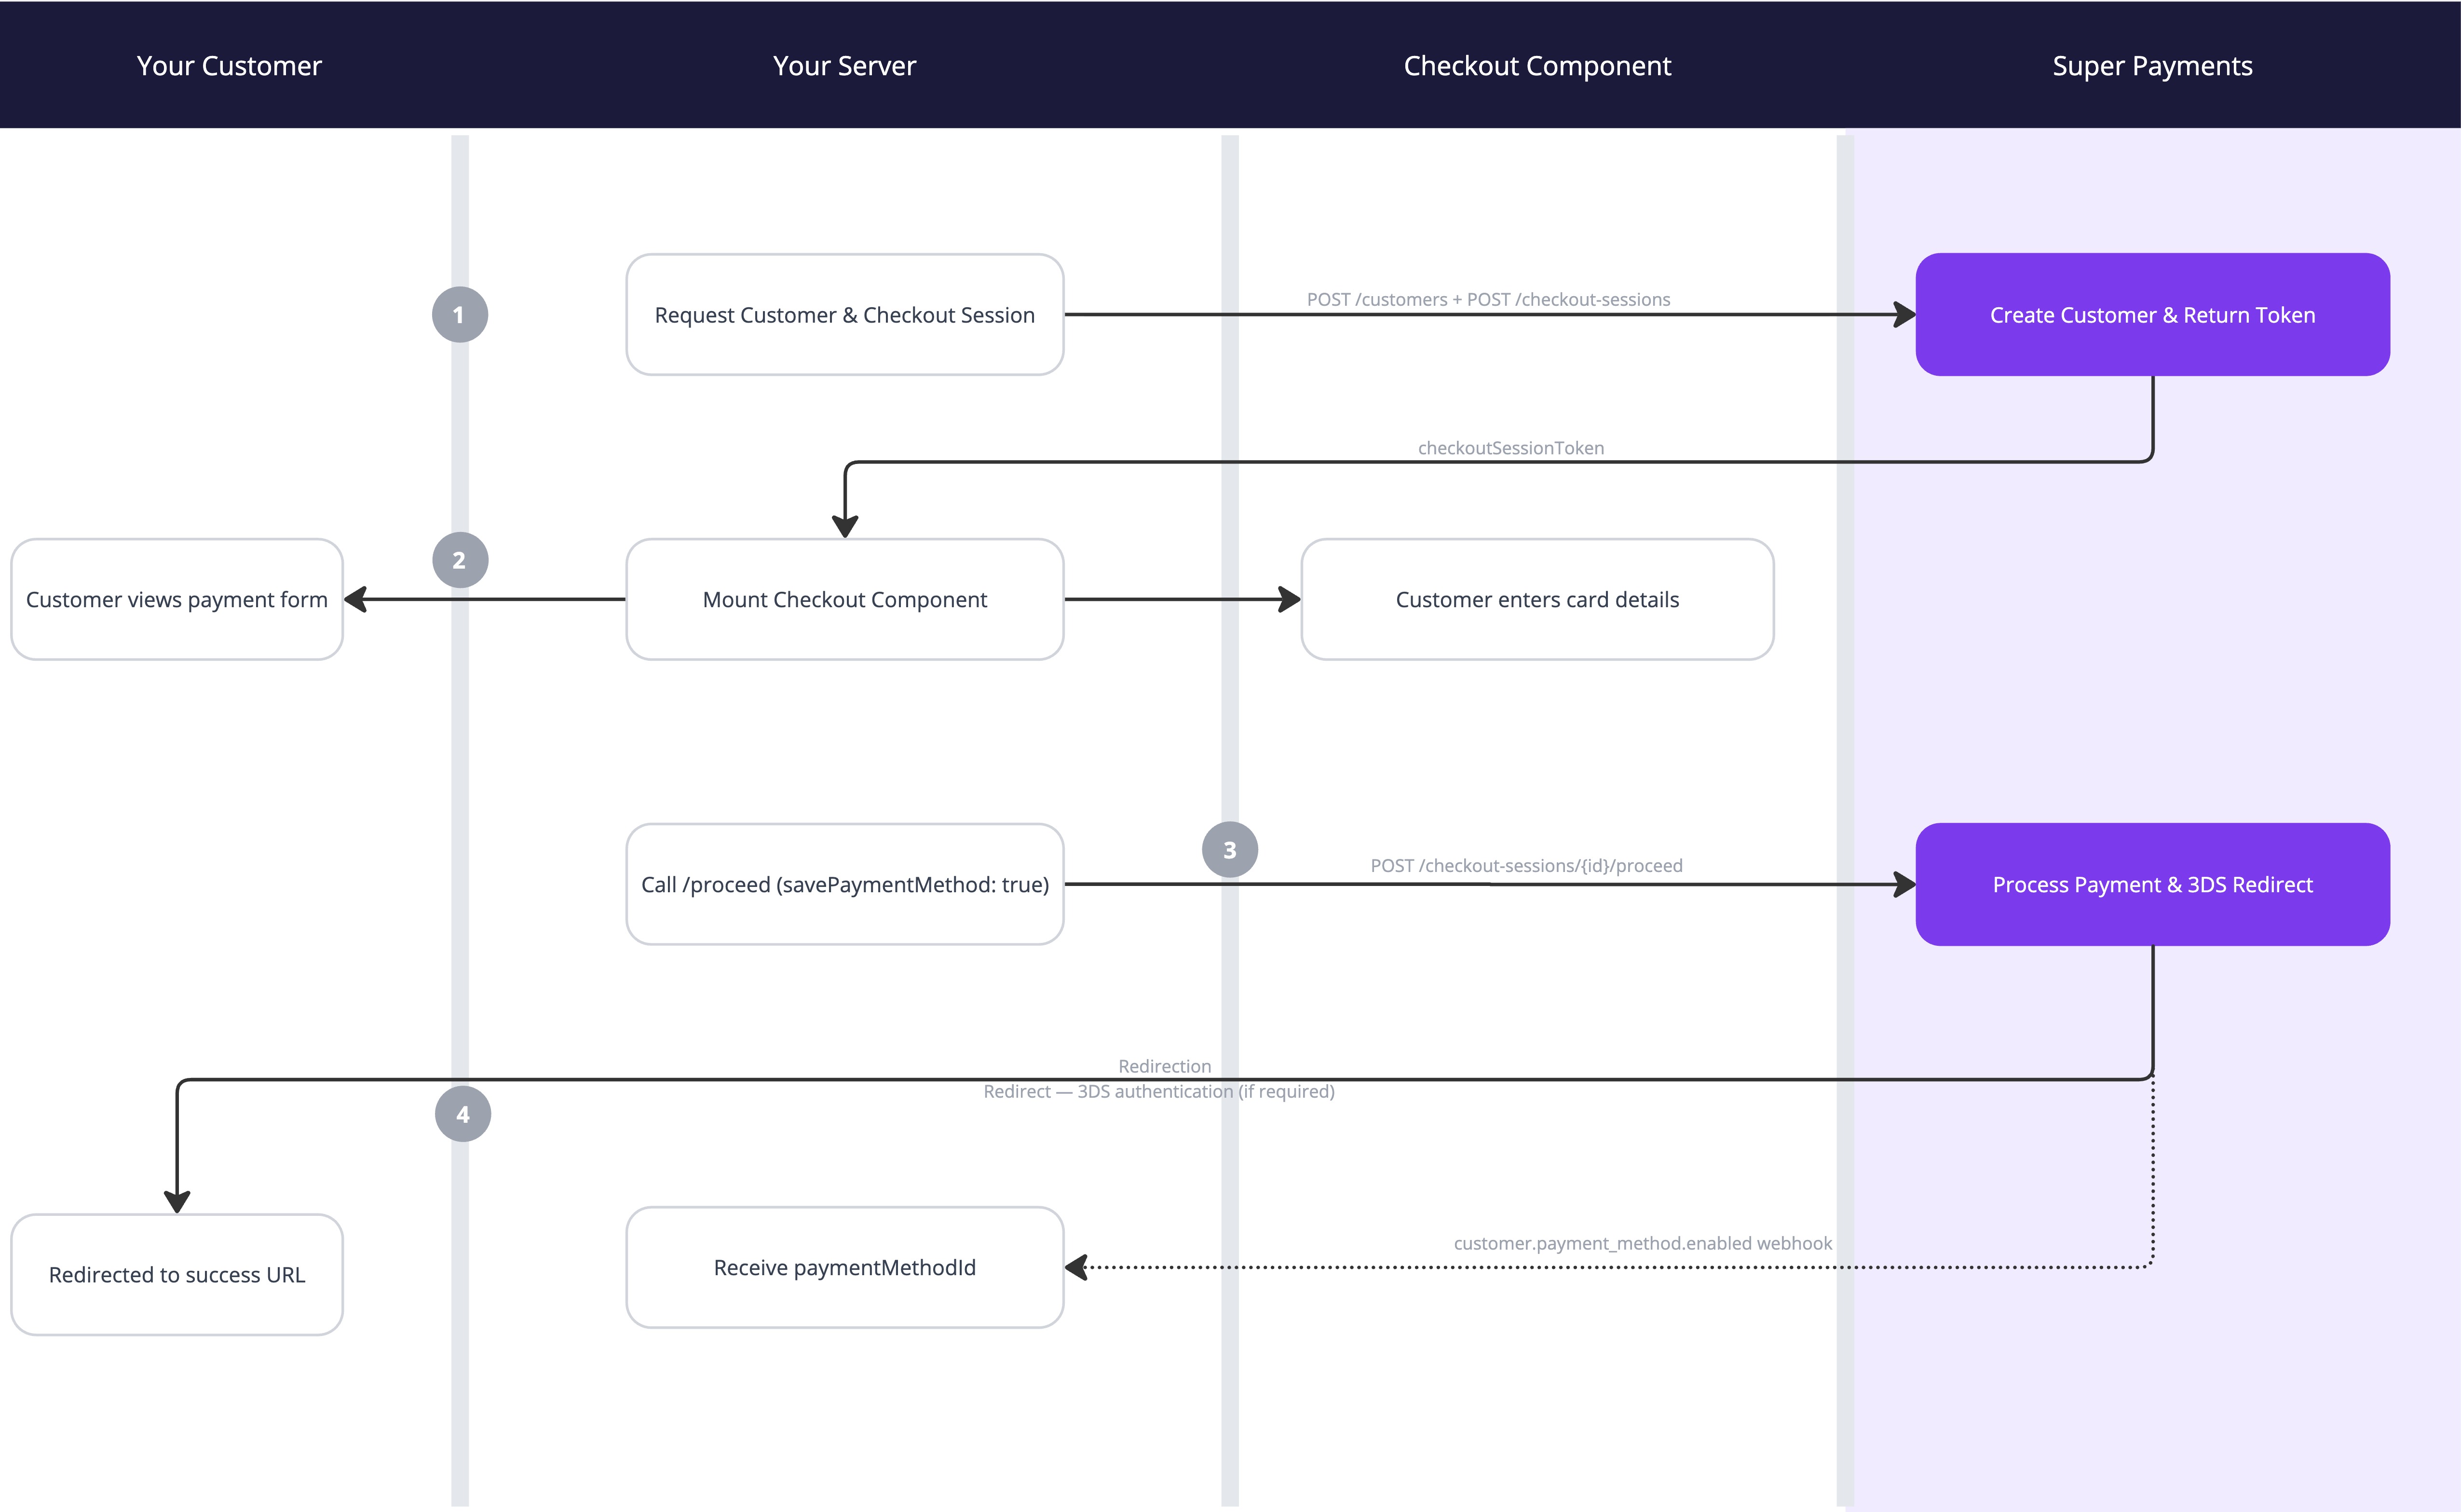
The initial payment is a cardholder-initiated transaction (CIT) - the customer is present and actively completing the checkout. As part of this flow:
- 3D Secure authentication is applied automatically. Super handles 3DS on your behalf. If the card issuer requires a challenge, the customer is redirected through it before landing on your
successUrl. - The card is tokenised and stored securely during the payment.
- Once the payment completes, a
customer.payment_method.enabledwebhook delivers thepaymentMethodIdyou will use for all future charges.
The saved card will show up for users on subsequent payment making checkout faster (cardholder-initiated transactions) or can be used for merchant-initiated transactions (MITs).
Prerequisites
- Your
paymentInitiatorIdandbrandId(available in the business portal) - A webhook endpoint configured to receive
customer.payment_methodevents, this can be done in the webhooks section test & production
Integration Guide
Contact your account manager to enabled Apple Pay and Google Pay tokenisation on your account.
Step 1: Create a Customer
Before initiating the checkout session, create a customer record in Super. Store the id returned in the response - you will pass this to the checkout session in Step 2.
Request
curl --request POST \
     --url https://api.superpayments.com/2026-08-01/customers \
     --header 'accept: application/json' \
     --header 'authorization: YOUR_SECRET_KEY' \
     --header 'content-type: application/json' \
     --data '{
       "brandId": "brand_ID",
       "emailAddress": "[email protected]",
       "externalReference": "customer_123",
       "firstName": "John",
       "lastName": "Smith",
       "metadata": {
         "Name": "SandboxUser"
       },
       "phoneNumber": "07462123456"
     }'
curl --request POST \
--url https://api.test.superpayments.com/2026-08-01/customers \
--header 'accept: application/json' \
--header 'authorization: YOUR_SECRET_KEY' \
--header 'content-type: application/json' \
--data '{
"brandId": "brand_ID",
"emailAddress": "[email protected]",
"externalReference": "customer_123",
"firstName": "John",
"lastName": "Smith",
"metadata": {
"test": "Sandbox"
},
"phoneNumber": "07462124356"
}'| Field | Type | Description |
|---|---|---|
brandId | string (UUID) | The ID of the brand under which the customer is being created. Found in your business portal. |
emailAddress | string | The customer's email address. |
externalReference | string | Your own unique identifier for this customer. Use this to map the Super customer back to your system. |
firstName | string | Customer's first name. |
lastName | string | Customer's last name. |
metadata | object | Optional key-value pairs for any additional data you want to associate with the customer. |
phoneNumber | string | Customer's phone number. |
Response
{
  "brandId": "brand_ID",
  "createdAt": "2026-12-12T12:12:12.893Z",
  "emailAddress": "[email protected]",
  "externalReference": "customer_123",
  "firstName": "John",
  "id": "cus_123456789",
  "lastName": "Smith",
  "metadata": {
    "test": "Sandbox"
  },
  "paymentMethods": [],
  "phoneNumber": "07462123456",
  "updatedAt": "2026-12-12T12:12:12.893Z"
}
📘 Store the
idfield (e.g.cus_***...) in your system against the customer record. You will need it in Steps 2 and 4.
Step 2: Create a Checkout Session with Customer
Create a checkout session as you would for a standard embedded payment, but include the customer.id from Step 1. This links the session to the customer so the saved card is associated with them after payment.
Request
curl --request POST \
     --url https://api.superpayments.com/2026-08-01/checkout-sessions \
     --header 'accept: application/json' \
     --header 'authorization: YOUR_SECRET_KEY' \
     --header 'content-type: application/json' \
     --data '{
       "customer": {
         "id": "cus_123",
       },
       "paymentInitiatorId": "3fa85f64-5717-4562-b3fc-2c963f66afa6"
     }'
curl --request POST \
--url https://api.test.superpayments.com/2026-08-01/checkout-sessions \
--header 'accept: application/json' \
--header 'authorization: YOUR_SECRET_KEY' \
--header 'content-type: application/json' \
--data '{
"customer": {
"id": "cus_1234"
},
"paymentInitiatorId": "ID1234"
}'Response
{
  "checkoutSessionId": "9a7f3bb3-4dfa-4a6d-bb85-99999999",
  "checkoutSessionToken": "eyJhbGciOiJIUzI1NiIsInR5cCI6IkpXVCJ9..."
}
Pass the checkoutSessionToken to the frontend to mount the component in Step 3.
Step 3: Mount the Checkout Component
Add the Super payment.js library and <super-checkout> web component to your page. Pass the checkoutSessionToken from Step 2 and the transaction amount.
<html>
  <head>...</head>
  <body>
    <script src="https://cdn.superpayments.com/js/payment.js"></script>
    <super-single-checkout
      amount="AMOUNT_IN_MINOR_UNITS"
      checkout-session-token="CHECKOUT_SESSION_TOKEN_FROM_STEP_2"
      payment-to-display="CARD"
      support-credit-popup="true"
    >
    </super-single-checkout>
  </body>
</html>
<html>
<head>...</head>
<body>
<script src="https://cdn.superpayments.com/js/test/payment.js"></script>
<super-checkout
amount="AMOUNT_IN_MINOR_UNITS"
checkout-session-token="CHECKOUT_SESSION_TOKEN_FROM_STEP_2">
</super-checkout>
</body>
</html>| Attribute | Type | Description |
|---|---|---|
amount | integer | Payment amount in minor units (e.g. 15000 = £150.00). |
currency | string | ISO 4217 currency code (e.g. GBP). |
checkout-session-token | string | Your checkout session |
payment-to-display | string | CARD => displays Card and BNPLBNPL => displays BNPL onlyEXPRESS_WALLETS => display Apple and Google pay buttonsAPPLE_PAY => displays Apple PayGOOGLE_PAY => displays Google PayOPEN_BANKING => displays Open Banking |
support-credit-popup | boolean | true BNPL will open as a window popupfalse BNPL will redirect the user to our own domain |
📘 3DS is handled automatically The checkout component and the
redirectUrlfrom Step 4 manage 3D Secure end-to-end. If the customer's issuer requires a challenge, they are routed through it before arriving at yoursuccessUrl. No additional 3DS configuration is needed.
When your customer clicks Place Order, call window.superCheckout.submit() to allow the component to validate card details before proceeding server-side:
<button onclick="handlePlaceOrderClicked()">Place Order</button>
<script>
async function handlePlaceOrderClicked() {
  const result = await document.querySelector('super-single-checkout').submit();
  // Handle any failures appropriately for your checkout, for example...
  if (result.status === "FAILURE") {
    if (result.errorMessage) {
      throw new Error(result.errorMessage);
    } else {
      // Include a default error message in case nothing was received on the failure response.
      throw new Error("Something went wrong. No money has been taken from your account. Please refresh the page and try again.");
    }
  } else if (result.status === "SUCCESS") {
    // Proceed to Step 4 - call your server to complete the payment
  }
}
</script>
Listening for card details validity
The super-single-checkout element exposes a registerCardDetailsHandler method. It fires whenever the shopper types into the card fields, letting you know whether the current card details are valid — useful for enabling/disabling your own "Pay" button, showing inline hints, etc
const checkoutElement = document.getElementById('super-single-checkout-web-component');

checkoutElement.registerCardDetailsHandler((event) => {
  const { cardDetailsValid } = event.detail;
  if (cardDetailsValid) {
    payButton.disabled = false;
  } else {
    payButton.disabled = true;
  }
});
Digital Wallet Setup (GOOGLE_PAY & APPLE_PAY)
Step 1: Domain Verification
Before initializing the wallets, you must verify your website domain within the Merchant Dashboard.
- Navigate to Brand Settings: Log in to your Super Payments Merchant Dashboard.
- Select Your Brand: Locate the specific brand you want to configure and click Edit.
- Open Card Configuration: Inside the brand menu, select Card Configuration.
-
For Apple Pay: Download the verification file named
apple-developer-merchantid-domain-associationhosted on this screen. Host this file on your website under the.well-known/directory (e.g.,https://yourdomain.com/.well-known/apple-developer-merchantid-domain-association).⚠️ CRITICAL DEPLOYMENT NOTES:
- Binary transfer: Upload this file using Binary mode in your SFTP/FTP client (e.g., FileZilla, Cyberduck). ASCII mode will corrupt the file structure and cause Apple's validation to fail.
- Content-Type header: Your web server must serve this file with Content-Type: text/plain - no charset suffix (i.e. text/plain; charset=utf-8 will fail). If you're unsure, check using curl -I https://yourdomain.com/.well-known/apple-developer-merchantid-domain-association and look for the content-type line.
-
- Register Your Domain: Click Add domain, enter the full URL of the website where the wallets will be hosted, and save your changes.
- Verify Domain: Click on the three dots, click Verify and wait until the domains are verified.
Step 2: Code Integration
Once your domain is verified, add the following initialization code to your website's checkout page to render the Apple Pay and Google Pay buttons.
<script>
  const checkoutElement = document.getElementById('super-single-checkout-web-component');

  checkoutElement.registerWalletsHandler(async () => {
    // Continue to server-side processing
  });
</script>
Step 3: Trigger the wallet sheet from your own button
Wire your own UI element to call triggerApplePay() or triggerGooglePay()
myApplePayButton.addEventListener('click', async () => {
  try {
    // Same for Google Pay with triggerGooglePay().
    await checkoutElement.triggerApplePay();
    // sheet opened successfully — result arrives later via the handler registered in step 2
  } catch (err) {
    // e.g. "registerWalletsHandler() must be called before triggering..."
    // or "Apple Pay / Google Pay is not available for this checkout."
    console.error(err);
  }
});
Note: triggerApplePay()/triggerGooglePay() resolving only means the wallet sheet was opened — it does not mean the payment succeeded. The actual result only arrives via the handler registerWalletsHandler .
Step 4: Complete the Payment
After receiving a SUCCESS result from the component, call the proceed endpoint server-side, making sure to pass in a customerObject with the id from step 1 and save options.
Request
curl --request POST \
     --url https://api.superpayments.com/2026-08-01/checkout-sessions/{checkoutSessionId}/proceed \
     --header 'accept: application/json' \
     --header 'authorization: YOUR_SECRET_KEY' \
     --header 'content-type: application/json' \
     --data '{
       {
          "amount": 15000,
          "currency": "GBP",
          "email": "[email protected]",
          "externalReference": "ORDER_123",
          "metadata": {
              "metadata": "test"
          },
          "paymentInitiatorId": "YOUR_PAYMENT_INIT_ID",
          "phone": "07462123456",
          "failureUrl": "https://your-site.com/failure",
          "successUrl": "https://your-site.com/success",
          "cancelUrl": "https://your-site.com/cancel",
          "customer": {
              "id": "cus_123",
              "savePaymentMethodOptions": {
                  "futureUsage": "OFF_SESSION",
                  "externalReference": "saved-card-primary",
                  "metadata": {
                      "card_nickname": "My Visa",
                      "card_type": "credit"
                  }
              }
          }
      }'
curl --request POST \
--url https://api.test.superpayments.com/2026-08-01/checkout-sessions/{checkoutSessionId}/proceed \
--header 'accept: application/json' \
--header 'authorization: YOUR_SECRET_KEY' \
--header 'content-type: application/json' \
--data '{
"amount": 15000,
"currency": "GBP",
"email": "[email protected]",
"externalReference": "ORDER_123",
"metadata": {
"metadata": "test"
},
"paymentInitiatorId": "YOUR_PAYMENT_INIT_ID",
"phone": "07462123456",
"failureUrl": "https://your-site.com/failure",
"successUrl": "https://your-site.com/success",
"cancelUrl": "https://your-site.com/cancel"
}'| Field | Type | Description |
|---|---|---|
amount | integer | Payment amount in minor units (e.g. 15000 = £150.00). |
currency | string | ISO 4217 currency code (e.g. GBP). |
externalReference | string | Your unique reference for this order. |
paymentInitiatorId | string | Your payment initiator ID from the business portal. |
successUrl / failureUrl / cancelUrl | string | Redirect destinations after the payment completes. |
preferNativeActions | boolean (optional) | To read about this field, just follow Inline 3DS documentation below. |
customer.savePaymentMethodOptions
customer.savePaymentMethodOptionscustomer.savePaymentMethodOptions | Type | Description |
|---|---|---|
futureUsage | enum | The intended future usage of the saved card. 'OFF_SESSION' payments are those where the shopper is not present (eg: subscriptions), 'ON_SESSION' payments are when the shopper is present and the card is saved to enable one-click functionality. |
externalReference | string | Optional reference to save this card against. |
metadata | string | Any additional metadata you wish to attach to this saved card. |
Response
{
  "checkoutSessionId": "9a7f3bb3-4dfa-4a6d-bb85-cc91e7098600",
  "paymentIntentId": "7e13dde2-0839-4943-9eaa-eb8686afc112",
  "redirectUrl": "https://hooks.paymentProvider.com/3d_secure_2/hosted?merchant=acct_1PEX2f..."
}
Redirect the customer to the redirectUrl immediately. This routes them through 3D Secure authentication (if required by their issuer) before landing on your successUrl or failureUrl.
📘 About the redirect The
redirectUrlhandles the complete post-payment flow including 3DS. Always redirect the customer to this URL - never assume the payment is complete after the proceed call returns.
Keeping the customer on your page during 3DS (optional)
By default, proceed returns a redirectUrl and the customer's whole page navigates through 3D Secure before landing back on your successUrl or failureUrl. If you'd rather keep the customer inside your embedded checkout instead of navigating them away, you can opt into native next actions.
To do this, pass preferNativeActions: true in your proceed request body:
{
  "amount": 1000,
  "currency": "GBP",
  "externalReference": "order_1234",
  "paymentInitiatorId": "YOUR_PAYMENT_INITIATOR_ID",
  "successUrl": "https://example.com/success",
  "failureUrl": "https://example.com/failure",
  "cancelUrl": "https://example.com/cancel",
  "preferNativeActions": true,
  "customer": {
    "id": "cus_xxx"
  }
}| Field | Type | Description |
|---|---|---|
preferNativeActions | boolean (optional) | When true, if the payment requires an additional customer action (suchas 3D Secure), proceed returns a nativeNextAction instead of a redirectUrl.Defaults to false. |
When preferNativeActions is true and a challenge is required, the response contains a nativeNextAction field instead of redirectUrl :
{
  "checkoutSessionId": "cs_xxx",
  "paymentIntentId": "pi_xxx",
  "nativeNextAction": "eyJ0eXBlIjoiUkVESVJFQ1RfVE9fVVJMIiwicmVkaXJlY3RVcmwiOiJ..."
}
Pass that string, unmodified, to handleNextAction on the checkout element:
const checkoutElement = document.getElementById('super-single-checkout-web-component');
const result = await checkoutElement.handleNextAction(nativeNextAction);

if (result.status === 'SUCCESS') {
  window.location.href = result.redirectUrl;
} else {
  // show result.errorMessage to the customer
}
handleNextAction renders the challenge inside your checkout and resolves once the customer has completed it — you don't need to build any UI for this yourself. The returned promise resolves with:
| Field | Type | Description |
|---|---|---|
status | 'SUCCESS' | 'FAILURE' | Whether the customer completed the required action. |
redirectUrl | string, optional | Present when status is SUCCESS. Redirect the customer here to complete the payment, same as the redirectUrl returned directly by proceed. |
errorMessage | string, optional | Present when status is FAILURE. |
📘 About native next actions If a payment doesn't require any additional customer action,
proceedreturnsredirectUrlas normal even whenpreferNativeActionsistrue— only callhandleNextActionwhen the response contains anativeNextAction. OncehandleNextActionresolves successfully, redirect the customer to the returnedredirectUrlimmediately, exactly as you would with theredirectUrlfrom the initial proceed response.
Step 5: Receive the paymentMethodId via Webhook
paymentMethodId via WebhookOnce the payment is authorised and the card has been saved, Super sends a customer.payment_method.enabled event to your configured webhook endpoint. The paymentMethodId in this event is what you will use for all future off-session charges.
Webhook Event: customer.payment_method.enabled
{
  "data": {
    "type": "CARD",
    "usage": "OFF_SESSION",
    "status": "ENABLED",
    "customerId": "cus_123",
    "merchantId": "YOUR_MERCHANT_ID",
    "paymentMethodId": "pm_123"
  },
  "eventId": "evt_123",
  "eventType": "customer.payment_method.enabled",
  "eventDatetime": "2026-12-12T12:12:12.000Z"
}| Field | Type | Description |
|---|---|---|
data.paymentMethodId | string | The key value. Store this against the customer in your system - it is used to initiate all future off-session charges. |
data.customerId | string | The Super customer ID this payment method belongs to. Use this to look up the customer in your system. |
data.type | string | Payment method type. Will be CARD for card-based off-session payments. |
data.usage | string | Will be OFF_SESSION confirming the card is enabled for merchant-initiated charges. |
data.status | string | ENABLED means the card is ready to be charged. |
data.merchantId | string | Your merchant ID in Super. |
eventType | string | Always customer.payment_method.enabled for this event. |
eventDatetime | string | ISO 8601 timestamp of when the payment method was enabled. |
📘 Webhook setup Configure your webhook endpoint in the business portal. Subscribe specifically to the
customer.payment_method.enabledevent type in addition to the payment status webhooks like payment.success. For general webhook guidance, see the Webhook Documentation.
3DS & SCA Reference
| Transaction type | Customer present? | 3DS required? | Who handles it? |
|---|---|---|---|
| Initial payment (this guide) | Yes - CIT | Yes, automatically | Super via redirectUrl |
| Future off-session charges | No - MIT | No | N/A - MIT exemption applies |
3DS2 authentication on the initial CIT is managed end-to-end by Super - the redirectUrl returned from the proceed call will route the customer through any required issuer challenge before completing. You do not need to pass any additional 3DS parameters.
Testing
Use the following test cards in the sandbox environment. For all cards, use:
- Expiry: any future date (e.g.
03/30) - CVC: any 3-digit number (e.g.
737) - Postcode: any value
Simulate a successful payment
Test 3D Secure authentication
For a full list of test cards and decline scenarios, see Test with Cards.
Next Steps
Updated 19 days ago