

Payment Links
A streamlined guide to our no-code payment solution.
Payment Links enable you to accept payments from your customers by generating a unique URL for a specific transaction. We manage the secure checkout environment and handle all sensitive payment data, minimizing your technical overhead.
The Payment Journey
- Request Payment Link: Send a request to our API; Super will return a unique link.
- Share with Customer: Send the URL to your customer via email, SMS, or your preferred digital channel.
- Secure Checkout: The customer enters their payment details in our protected, hosted environment.
- Return to Site: Once the transaction is processed, we redirect the customer to your designated success or failure URL.
Creating a Payment Link
Payment links can be created in two ways depending on your use case.
Via the Business Portal
Best for sales teams, ad-hoc payments, and one-off invoices - no code required.
- Log in to the Business Portal and navigate to Payment Links in the sidebar.
- Click Create in the top right corner.
- Set up payment link - fill in the core payment details:
- Amount (required) - enter the payment amount in pounds.
- Your Reference (optional) - an internal reference such as an invoice number. Your customer will not see this.
- Expires (optional) - set an expiry date after which the link can no longer be used.
- Payment category (optional) - add order details for the transaction. Select from Car rental, Flight, Hotel, or Product and fill in the relevant fields. Line items are optional for non-travel brands.
- Address (optional) - add a billing and/or shipping address for the customer.
- Custom fields (optional) - attach up to 10 additional key-value fields to store extra information against the payment link.
- Click Create Payment Link.
- Copy the generated link from the confirmation screen and share it with your customer.
Note: Payment links created via the Business Portal will redirect customers to your brand's website upon completion. Custom redirect URLs are only supported via the API.
Via the API
Best for automated workflows where you need full control over redirect URLs and request parameters.
The diagram below illustrates the full API integration flow.
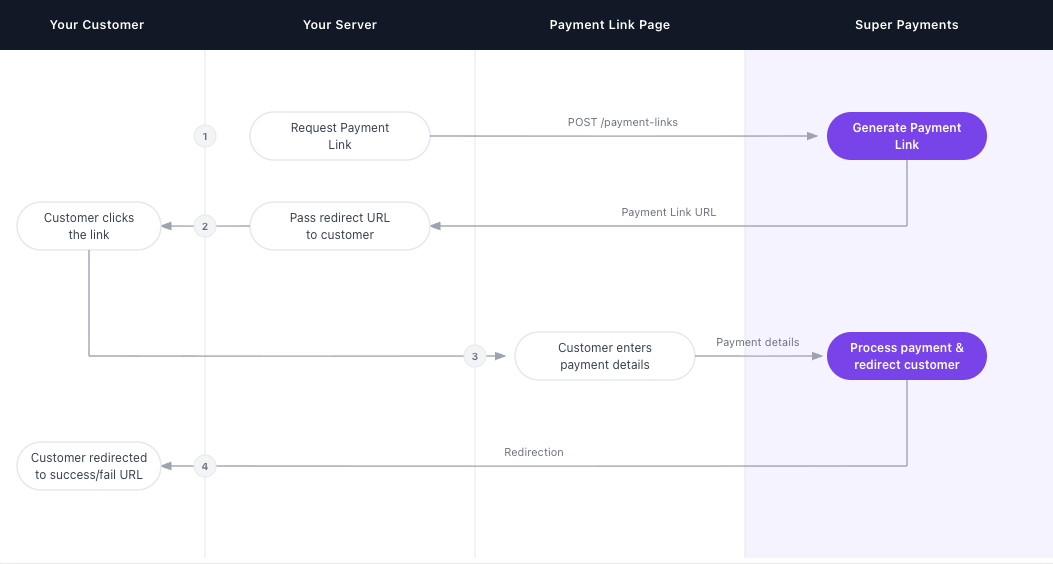
Step 1: Request a Payment Link
Make a POST request to the /payment-links endpoint with the amount, reference, and your redirect URLs.
Request Example
curl --location 'https://api.superpayments.com/2026-08-01/payment-links' \
--header 'Content-Type: application/json' \
--header 'Accept: application/json' \
--header 'Authorization: YOUR_SUPER_SECRET_KEY' \
--data '{
  "brandId": "YOUR_BRAND_ID",
  "externalReference":"Order-123",
  "amountInMinorUnits": 5000,
  "purpose": "PURCHASE",
  "successUrl":"https://www.example.com/success",
  "failureUrl":"https://www.example.com/failure",
  "cancelUrl":"https://www.example.com/cancel"
  }'
curl --location 'https://api.test.superpayments.com/2026-08-01/payment-links' \
--header 'Content-Type: application/json' \
--header 'Accept: application/json' \
--header 'Authorization: YOUR_SUPER_SECRET_KEY' \
--data '{
"brandId": "YOUR_BRAND_ID",
"externalReference":"Order-123",
"amountInMinorUnits": 5000,
"purpose": "PURCHASE",
"successUrl":"https://www.example.com/success",
"failureUrl":"https://www.example.com/failure",
"cancelUrl":"https://www.example.com/cancel"
}'Response Example
200 Payment Link Created
{
  "amountInMinorUnits": 5000,
  "brandId": "YOUR_BRAND_ID",
  "cancelUrl": "https://www.example.com/cancel",
  "createdAt": "2026-01-01T01:01:01.000Z",
  "expiresAt": null,
  "externalReference": "Payment Link Example",
  "failureUrl": "https://www.example.com/failure",
  "id": "8f255c5f-fdfc-4fa6-8642-297a17209234",
  "metadata": null,
  "paymentReferences": [],
  "purpose": "PURCHASE",
  "status": "UNPAID",
  "successUrl": "https://www.example.com/success",
  "updatedAt": "2026-01-01T01:01:01.000Z",
  "url": "https://link.test.superpayments.com/id/8f255c5f-fdfc-4fa6-8642-297a17209234"
}
Step 2: Share the Link with Your Customer
Pass the url from the response to your customer via email, SMS, or any digital channel.
Step 3: Customer Completes Payment
The customer is directed to the hosted payment link page where they enter their payment details. Super securely processes the transaction.
Step 4: Customer is Redirected
Once the payment is processed, the customer is redirected to your successUrl or failureUrl depending on the outcome.
Saving a Card via Payment Link
You can save a customer's card during a Payment Link transaction by creating a customer record first and including their ID in the payment link request. Once the customer completes the payment, Super sends a customer.payment_method.enabled webhook containing the paymentMethodId for future charges.
📘 Pricing
Saved card payments are subject to additional charges. For full pricing details, visit our Pricing page.
Step 1: Create a Customer
Before creating the payment link, create a customer record in Super. Store the id returned in the response.
Request
curl --location 'https://api.superpayments.com/2026-08-01/customers' \
--header 'Content-Type: application/json' \
--header 'Accept: application/json' \
--header 'Authorization: YOUR_SUPER_SECRET_KEY' \
--data '{
  "brandId": "YOUR_BRAND_ID",
  "emailAddress": "[email protected]",
  "externalReference": "customer_123",
  "firstName": "John",
  "lastName": "Smith",
  "phoneNumber": "07462123456"
}'
curl --location 'https://api.test.superpayments.com/2026-08-01/customers' \
--header 'Content-Type: application/json' \
--header 'Accept: application/json' \
--header 'Authorization: YOUR_SUPER_SECRET_KEY' \
--data '{
"brandId": "YOUR_BRAND_ID",
"emailAddress": "[email protected]",
"externalReference": "customer_123",
"firstName": "John",
"lastName": "Smith",
"phoneNumber": "07462123456"
}'200 Customer Created
{
  "id": "cus_123",
  "brandId": "YOUR_BRAND_ID",
  "emailAddress": "[email protected]",
  "externalReference": "customer_123",
  "firstName": "John",
  "lastName": "Smith",
  "paymentMethods": [],
  "createdAt": "2026-03-15T10:00:00.000Z",
  "updatedAt": "2026-03-15T10:00:00.000Z"
}
📘 Store the
id(e.g.cus_...) against the customer in your system. You will need it in the next step.
Step 2: Create the Payment Link with Card Saving
Add the customer object to your payment link request with savePaymentMethod: true and the id from Step 1.
Request
curl --location 'https://api.superpayments.com/2026-08-01/payment-links' \
--header 'Content-Type: application/json' \
--header 'Accept: application/json' \
--header 'Authorization: YOUR_SUPER_SECRET_KEY' \
--data '{
  "brandId": "YOUR_BRAND_ID",
  "externalReference": "Order-123",
  "amountInMinorUnits": 5000,
  "purpose": "PURCHASE",
  "customer": {
    "id": "cus_123",
    "savePaymentMethod": true
  },
  "successUrl": "https://www.example.com/success",
  "failureUrl": "https://www.example.com/failure",
  "cancelUrl": "https://www.example.com/cancel"
}'
curl --location 'https://api.test.superpayments.com/2026-08-01/payment-links' \
--header 'Content-Type: application/json' \
--header 'Accept: application/json' \
--header 'Authorization: YOUR_SUPER_SECRET_KEY' \
--data '{
"brandId": "YOUR_BRAND_ID",
"externalReference": "Order-123",
"amountInMinorUnits": 5000,
"purpose": "PURCHASE",
"customer": {
"id": "cus_123",
"savePaymentMethod": true
},
"successUrl": "https://www.example.com/success",
"failureUrl": "https://www.example.com/failure",
"cancelUrl": "https://www.example.com/cancel"
}'Step 3: Receive the paymentMethodId via Webhook
paymentMethodId via WebhookOnce the payment is authorised and the card saved, Super sends a customer.payment_method.enabled event to your webhook endpoint. Store the paymentMethodId from this event against the customer in your system.
{
  "data": {
    "type": "CARD",
    "usage": "OFF_SESSION",
    "status": "ENABLED",
    "customerId": "cus_123",
    "merchantId": "123-123-123-123",
    "paymentMethodId": "pm_123"
  },
  "eventId": "evt_test_123",
  "eventType": "customer.payment_method.enabled",
  "eventDatetime": "2026-03-15T10:01:00.000Z"
}
📘 For full webhook setup guidance, see the Webhook Documentation.
Once you have the paymentMethodId, you can use it to charge the customer at any time - see Charge a Saved Card.
Confirm the Payment Status
📘 Note
Super sends webhooks for Payment Links. To retrieve the final status you can either listen for the
payment.successorpayment.failedwebhook events, or poll our GET Payment Link endpoint using the payment link ID.
Request Example
curl --location 'https://api.superpayments.com/2026-08-01/payment-links/2826959b-3319-4f43-b1bb-e5adc7efaecb' \
--header 'Accept: application/json' \
--header 'Authorization: YOUR_SUPER_SECRET_KEY'
curl --location 'https://api.test.superpayments.com/2026-08-01/payment-links/2826959b-3319-4f43-b1bb-e5adc7efaecb' \
--header 'Accept: application/json' \
--header 'Authorization: YOUR_SUPER_SECRET_KEY'Response Example
200 Payment Link Details
{
  "amountInMinorUnits": 5000,
  "brandId": "YOUR_BRAND_ID",
  "cancelUrl": "https://www.example.com/cancel",
  "createdAt": "2026-01-01T01:01:01.000Z",
  "expiresAt": "2026-01-01T01:01:01.000Z",
  "externalReference": "Order 123",
  "failureUrl": "https://www.example.com/failure",
  "id": "2826959b-3319-4f43-b1bb-e5adc7efaecb",
  "metadata": null,
  "paymentReferences": [],
  "purpose": "PURCHASE",
  "status": "UNPAID",
  "successUrl": "https://www.example.com/success",
  "updatedAt": "2026-01-01T01:01:01.001Z",
  "url": "https://link.test.superpayments.com/id/2826959b-3319-4f43-b1bb-123456643"
}
Payment Link Status Definitions
| Status | Description |
|---|---|
UNPAID | The link has been created but no successful payment has been processed. |
PAID | The transaction was successfully authorised and funds have been captured. |
EXPIRED | The link has passed its expiry date and can no longer be used. |
CANCELLED | The link was cancelled and is no longer active. |
Updated 2 months ago